|
| flower photo i transfered.... we will come back to this. |
I've seen and admired and have WANTED to try the whole "transfer a photo to canvas" thing for a while... so I did.
Here's what I learned:
- it's okay to have an inkjet printer and not a laser printer... you will not kicked out of the trailer park.
- it's NOT okay to use a photo with tons and tons of details.
- i still don't know the difference between freezer paper and wax paper, so the transparency technique is great for those of us (me) that don't know about kitchen utensils.
- my printer hates me.
- it's NOT affordable to use transparencies.
- page protectors from the scrapbook section that are 59million for $1.00 work just the same as the transparencies that make you gasp and gasp again in the middle of the office stuff store when you see the price tag then look again thinking you should get to the eye doctor ASAP because there is NO WAY you were seeing that price tag right.
- finger painting is fun.
- yer gonna mess up the first one (or two... or three) so have your white spray paint on-the-ready.
- the Gel Medium works WAY better when spread so thin you can't decide if you really applied it or if you just THOUGHT you applied it.
- saturate your colors.... saturate, saturate, saturate.
- fingernail polish is way better than just plain ol' paint.
shall we begin?
Take your favorite photo (in my case... my favorite subject):
and mess with it until you have HIGH CONTRAST (I went black and white) messing with your color saturation as much as you dare. When you are happy with it, trim down a plastic page protector, slide it in to your printer, and hit print! The ink just sits on the plastic and waits for you like a stalker.

THIS stuff rules!!! But... it only rules in super thin layers. The first photo (the flower) I put it on tooooooo thick and ended up with a MESS that ended up looking kind of artsy fartsy... but we'll get back to that. In the mean time, dip your finger in and just BARELY cover your canvas top to bottom, side to side.

Flip your image over, carefully drop it on and then "burnish" it. I used a little wooden hand because my hand was using the remote control for the camera, and the wooden hand was just.... there (you know how I am about body parts laying around...). BUT - you can "burnish" with your finger tip because the gel medium picks up THAT good and rather quickly. Be prepared to lose some of your details... or at least be prepared for some "runny fuzzy" action with your details.

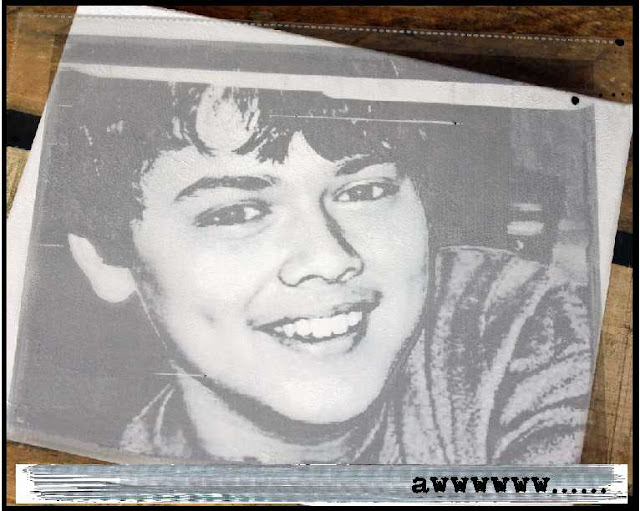
Lift the clear protector off and Voila! Image transfer.
THIS is where I learned that I need to up my saturation levels... it looks kind of "charcoalish"... which is fine 'cause he's so cute he makes my heart get all "runny fuzzy". Next TIME I will probably run through a whole cartridge of black ink because I want it less "charcoalish".
Or.... I could take the image and add finger nail polish when I want more color:

because sometimes I give canvases manicures. Do you see the "texture"? THAT is where I learned that a super thin layer of gel stuff is better.
comin' to you LIVE from a single-wide where I want to THANK YOU for your kind words, thoughts and prayers for the loss of our family friend, Richard. Richard's Grandson is an AMAZING young man full of courage and bravery... truly amazing... and I'm thinking that he gets it from his Grandfather. Through everything, I have found a new friend, Pat. Pat is Richard's sister-in-law, and she talks about Richard and his Grandson today here...

and mess with it until you have HIGH CONTRAST (I went black and white) messing with your color saturation as much as you dare. When you are happy with it, trim down a plastic page protector, slide it in to your printer, and hit print! The ink just sits on the plastic and waits for you like a stalker.

THIS stuff rules!!! But... it only rules in super thin layers. The first photo (the flower) I put it on tooooooo thick and ended up with a MESS that ended up looking kind of artsy fartsy... but we'll get back to that. In the mean time, dip your finger in and just BARELY cover your canvas top to bottom, side to side.

Flip your image over, carefully drop it on and then "burnish" it. I used a little wooden hand because my hand was using the remote control for the camera, and the wooden hand was just.... there (you know how I am about body parts laying around...). BUT - you can "burnish" with your finger tip because the gel medium picks up THAT good and rather quickly. Be prepared to lose some of your details... or at least be prepared for some "runny fuzzy" action with your details.

Lift the clear protector off and Voila! Image transfer.
THIS is where I learned that I need to up my saturation levels... it looks kind of "charcoalish"... which is fine 'cause he's so cute he makes my heart get all "runny fuzzy". Next TIME I will probably run through a whole cartridge of black ink because I want it less "charcoalish".
Or.... I could take the image and add finger nail polish when I want more color:

because sometimes I give canvases manicures. Do you see the "texture"? THAT is where I learned that a super thin layer of gel stuff is better.
comin' to you LIVE from a single-wide where I want to THANK YOU for your kind words, thoughts and prayers for the loss of our family friend, Richard. Richard's Grandson is an AMAZING young man full of courage and bravery... truly amazing... and I'm thinking that he gets it from his Grandfather. Through everything, I have found a new friend, Pat. Pat is Richard's sister-in-law, and she talks about Richard and his Grandson today here...